“How in the world do you make a sound on this thing?” I asked my parents as we opened the case of my rented student flute in the fall of my 6th grade year. I knew enough to wait to even try to put it together until my band director could guide me, but it sure looked pretty. This was pre-internet, before “Teach Yourself Flute” YouTube videos were a thing, and I didn’t even know the word embouchure, much less how to form one and where the flute belonged on my face.
I carry this experience with me whenever I work with a new student or aspiring teachers. Every other wind/brass instrument has some sort of mouthpiece that (for better or worse) directs the player’s mouth into some sort of embouchure. The flute has a lip plate that could go literally anywhere, with the only physical feedback being the quality of tone (if any at all) that is produced. This placement can be reduced to five primary variables as taught to me by my former teacher, Katherine Borst Jones, and an adjustment to any one of these variables can change a player’s tone and intonation dramatically.
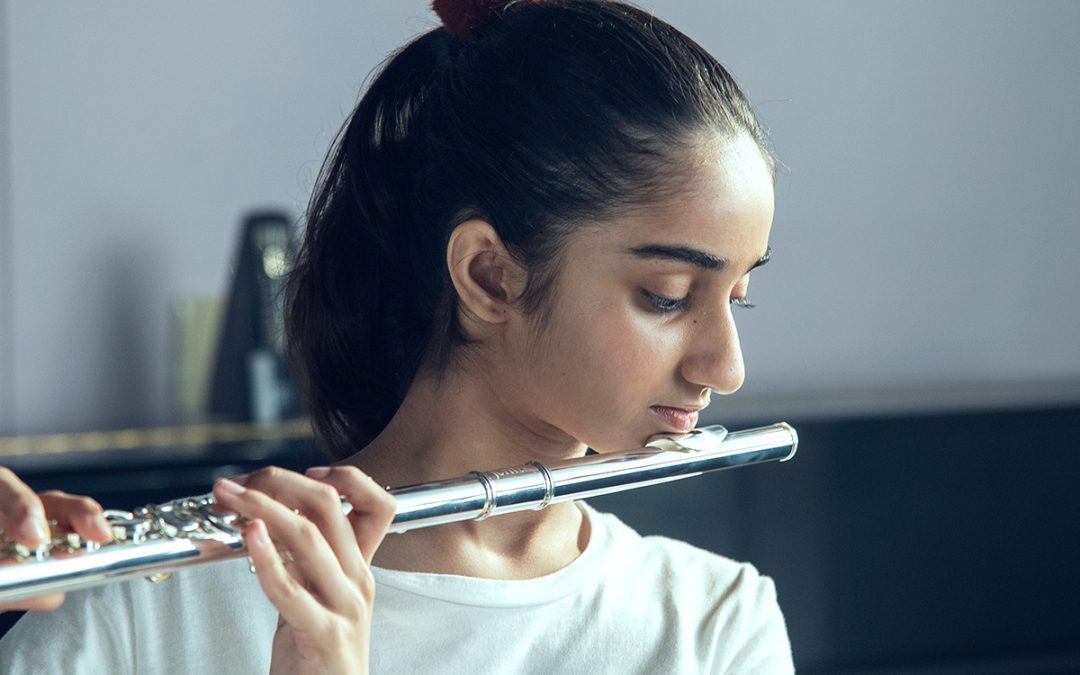
The TLDR that I give someone who works with beginning flutists is that, generally, the embouchure hole should be placed centered on and perpendicular (right angle) to the nose, with the near edge of the embouchure hole about at the edge of the lower lip (this may need to be adjusted slightly higher for very full lips or slightly lower for very thin lips, but is a good place to start). The far edge, or “blowing edge” of the embouchure hole should be just visible if you’re looking straight on at the student.
From that starting point, the five variables of headjoint placement allows for more nuance and refinement in the positioning of the headjoint. Although I rarely actually list them for a beginner, I do find that knowing them helps me in the troubleshooting process. Changing where the headjoint is placed on the lip causes the air to hit the blowing edge of the embouchure hole at a different angle, potentially changing intonation, register, and clarity of the tone. Having a student work with the headjoint only in the beginning allows them (and you) to troubleshoot with the framework of these variables without the extraneous complications of fingerings and the weight of the full instrument.
- Angle to the floor: The headjoint should be parallel to the lip opening and perpendicular to the nose

- High/low on lip: The embouchure hole should be at the bottom edge of lip

- Right/left centering on lip: center the embouchure hole on nose

- Rolling in or out: the embouchure hole is “rolled in” if too much of it is facing the student, rolled out if more than the blowing edge is visible

- Angle of the flute (or headjoint) from shoulder: the flute should make a 45 degree angle to the shoulder

Of these five, rolling in or out (#4), effectuates the most dramatic intonation change while also making the tone sound either “open” (out) or “covered” (in). It is also the only variable that is not only affected by how the player puts the headjoint on their lip, but how the player puts the headjoint on the flute as well. The angle of the flute to the floor (#1) is the easiest to spot from a distance (think of a flute section with all the flutes drooping in an effort to not whack their standmate in the ear). The side-to-side placement of the embouchure hole on the lip (#3) is the most critical in the beginning for the development of a centered embouchure. How high or low on the lip the lip plate is placed (#2) and the angle of the flute to the shoulder (#5) are, in my experience, the easiest to overlook and small tweaks to those from time to time can make a big difference especlally in intermediate/advanced student flute tone.
As students grow, all of these variables can and should be reassessed. Sometimes an adjustment to one leads to an adjustment of another while always using our ear as our guide. Does the adjustment make the tone airier or clearer? Richer or thinner? More in tune? More consistent? In the desired register? Framing headjoint placement within the confines of five variables (1. Angle to floor, 2. High/Low, 3. Right/Left, 4. In/Out, and 5. Angle to shoulder) allows students and teachers t systematically find the “sweet spot” and develop a strong, clear, consistent tone.
Do you want to learn more beginning flute tips from Meret?
Altus artist MERET BITTICKS maintains an active schedule as a soloist, chamber musician, and clinician in the U.S. and abroad while on faculty at the Music Institute of Chicago, Lake Forest College, and DePaul University. She joined Trio Chicago and Friends for international concert tours, including the United Arab Emirates and Australia, and has been a regular member of several local chamber groups. Ms. Bitticks is a registered Suzuki Flute Teacher Trainer and in 2013 became the first flutist to receive a Certificate of Achievement for excellence in Suzuki instruction from the Suzuki Association of the Americas. Her first book, Working With Young Flutists, An Educator’s Guide is published by F-flat Books and is available on Amazon, Barnes and Noble and from the publisher. A former volunteer at music camps in Haiti, Ms. Bitticks serves on the advisory council for BLUME Haiti, an organization that promotes leadership through music education.
The content of this Blog article or Banded Story is the intellectual property of the author(s) and cannot be duplicated without the permission of KHS America and/or the author(s). Standard copyright rules apply.